![]()
OVERVIEW
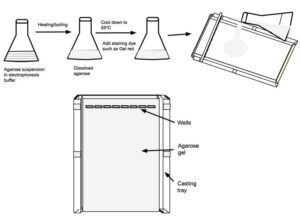
Agarose is insoluble in aqueous electrophoresis buffers at room temperature. However, when the suspension of agarose in an aqueous buffer (e.g., TAE or TBE) is heated to boiling, agarose particles melt and form uniform clear viscous solution. When this solution is allowed to cool down, it forms a translucent gel that has sieving properties and it allows separation of large macromolecules such as DNA, RNA and large proteins.
When you plan to prepare an agarose gel you should keep the following things in your mind
Size-range of DNA fragments to be analyzed: This will help you to determine the agarose percentage in the gel and type of electrophoresis buffer.
High percentage agarose gel for separation of short DNA fragments and low percentage for separation of large DNA fragments.
TBE buffer is a better choice for separation of short DNA fragments whereas TAE is for the separation of large DNA fragments.
Number of samples to be analyzed: This will help you to determine the number of wells in the agarose gel and its width.
Sample volume: The volume of wells should be sufficient enough to accommodate required volume of each sample. Well volume can be adjusted by choosing a comb with appropriate teeth size (width and length) and gel thickness. Gel thickness can be controlled by the volume of melton agarose.
Visualization procedure: You can add DNA staining dye in the gel while preparing it or you can stain the gel after electrophoresis.
Purpose of gel: Analytical or preparative. If the purpose is to elute the DNA from the gel, TAE buffer is a better choice than the TBE buffer.
See also
REQUIREMENTS
Reagents and solutions
◊ Agarose
◊ Ethidium bromide solution (10 mg/ml in water) or any other suitable DNA staining dye
◊ Electrophoresis buffer (TAE or TBE Buffer)
◊ Deionized/distilled water
Equipment and disposables
◊ Gel casting tray and combs
◊ Micropipettes and tips
◊ Gloves
◊ Measuring cylinder
◊ Microwave/Hot plate
Note:
1. Prepare the casting tray by sealing both open ends of the tray with tape (video). Pour water in the tray to check whether the tray is sealed properly and is not leaky.
2. Casting tray and electrophoresis appratus can be purchased from several suppliers. Now many suppliers offer casting trays that do not need to be sealed with tape and have a special set-up to accommodate molten agarose without leakage. You must follow the procedure described in the manual.
OBJECTIVE
Preparation a 0.8 % agarose gel (gel size – 10 cm x 12 cm x 0.4 cm) in TAE buffer or TBE buffer
Notes
1. Depending on the size of DNA fragments to be resolved, one can choose the concentration (0.5 – 2%) of the agarose gel. Here we have taken an example to clearly describe the preparation process.
2. Use a low percentage of agarose gel to resolve high molecular weight DNA and high percentage to resolve low molecular weight DNA.
3. Use 0.5X TBE buffer or 1X TAE buffer for running and preparation of agarose gel. Always use the same running buffer in which the agarose gel is prepared.
PROCEDURE:
Step 1: Weigh out 0.4 g agarose in a conical flask/bottle. Add 50 ml of 1X TAE buffer. Suspend the agarose by swirling the flask. Wait for 1 – 2 min to allow hydration of agarose particles.
Notes
1. To make 0.8 % agarose gel of size 10 cm (width) x 12 cm (length) x 0.4 cm (thickness), 50 ml solution is required.
2. The volume of the flask/bottle should be 3 – 4 times the volume of the agarose solution being prepared.
Tip
The total gel volume varies depending on the size of the casting tray. Use the following formula to calculate the volume of agarose solution:
Total volume of agarose solution = width of casting tray x length of casting tray x thickness of gel.
Precaution:
Remember to add buffer not water. If you prepare agarose gel in water, DNA will not move in the gel when you start electrophoresis.
Step 2: Weigh the flask/bottle.
Note:
Sometimes, there is a significant loss of water during the melting process, which depends on the melting procedure. You can calculate the loss of water by weighing the flask/bottle just before and after the melting process. Loss of water is significantly high when you prepare agarose suspension in a conical flask/beaker (no lid) and melt it in a microwave.
Step 3: Melt the agarose in a microwave or hot plate until the solution becomes clear. While heating, swirl the flask occasionally.
Tip
Heat the solution for several short intervals instead of boiling continuously. Continuous boiling can cause the solution to boil out of the flask.
Precaution
Make sure that the melted agarose solution appears clear and transparent, devoid of any suspended particles of agarose. Melt it more if there are some suspended particles.
Step 4: Weigh the flask/bottle again and make up the loss by adding deionized/distilled water (do not add buffer).
Step 5: Cool the solution until the temperature reaches 55 – 60°C.
Tips
1. Swirl the flask occasionally to cool the solution evenly.
2. You can store the solution in a 60°C water bath to prevent overcooling of agarose. This can take 15 – 20 min. A casting tray can be prepared during this time.
Step 6 (optional): Add Ethidium bromide to agarose solution
Add 2.5 μl ethidium bromide in the solution. Mix by gentle swirling. Avoid air bubble formation.
Precautions
1. Ethidium bromide is carcinogenic. Use appropriate safety measures (wear latex gloves and lab coat) to avoid any harm.
2. Do not add Ethidium bromide when the solution is very hot.
Step 7: Set the comb and pour the molten agarose solution into the casting tray
♦ Pour the molten agarose solution into the casting tray.
♦ Insert the comb at appropriate place.
Tips
1. One can place the comb before pouring the agarose solution into the casting tray.
2. Remove air bubbles with the help of pipette tip.
Precaution
While inserting the comb, take care that the teeth of the comb should not touch the bottom of the casting tray. If it touches, the well will be like a hole and samples will leak out from the well.
Step 8: Wait until agarose is solidified completely. Solidified agarose gel will appear milky white.
Agarose gel is ready for use.
Note
Agarose gel can be stored for a few days. To store the agarose gel, we recommend not to remove comb and tape. Dip the agarose gel in the TBE buffer so that it contains moisture. Seal the gel in a plastic wrap and store it in the cold room (4°C). Before starting electrophoresis, let it come to room temperature.
| Agarose amount required for the preparation of agarose solution of specific concentration and volume | ||||||
| Volume (ml)/Conc (%) | 0.5% | 0.8% | 1.0% | 1.2% | 1.5% | 2.0% |
| 30 ml | 0.15 g | 0.24 g | 0.3 g | 0.36 g | 0.45 g | 0.6 g |
| 40 ml | 0.2 g | 0.32 g | 0.4 g | 0.48 g | 0.6 g | 0.8 g |
| 50 ml | 0.25 g | 0.4 g | 0.5 g | 0.6 g | 0.75 g | 1.0 g |
| 100 ml | 0.5 g | 0.8 g | 1.0 g | 1.2 g | 1.5 g | 2.0 g |
| 200 ml | 1.0 g | 1.6 g | 2.0 g | 2.4 g | 3.0 g | 4.0 g |
| 500 ml | 2.5 g | 4.0 g | 5.0 g | 6.0 g | 7.5 g | 10.0 g |
4 thoughts on “Protocol: Preparation of Agarose Gel for DNA Analysis”